 AZTECH

MONTEZUMA walkthrough
Nine minutes, start to finish: a short introduction to Aztech, then Operation COPPER CURRENT played through injects, Mission Web, key terrain, Futures, what-if branches, execution with staff advisers, adjudication and the after-action report.
Most wargames end in a slide deck. MONTEZUMA ends in a decision you can defend.
Tabletop exercises still run on spreadsheets, scripted red teams and someone's notes. The result is an opinion. MONTEZUMA turns the same exercise into evidence: options that were actually fought, an opponent that actually adapted, and a record of every call.
Open it like a command post.
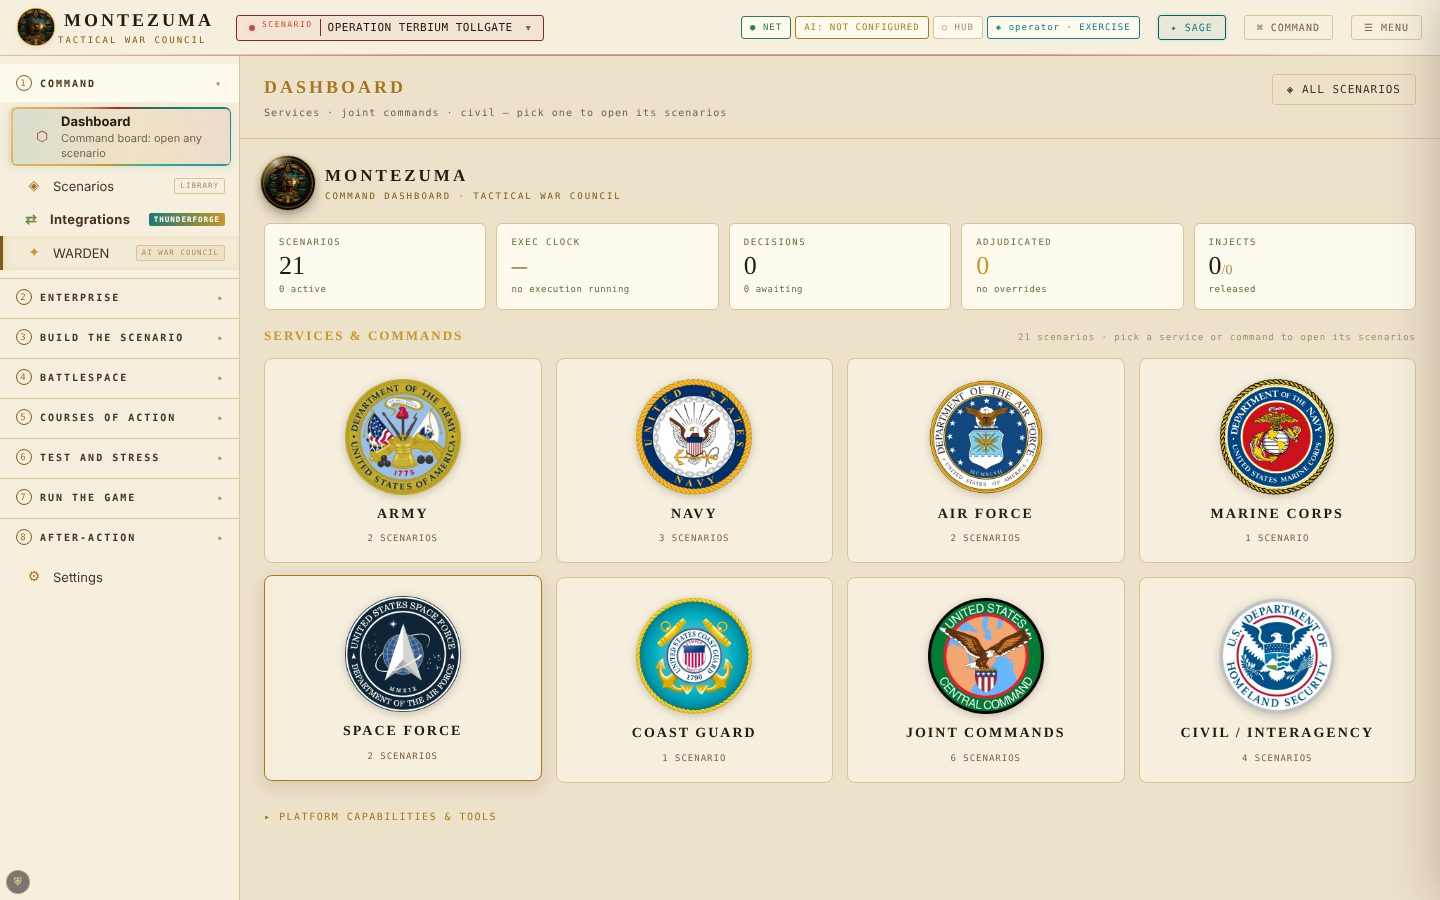
MONTEZUMA opens on a board of the six services, the combatant commands and a civil and interagency button. Every scenario is filed under the service or command that leads it, wearing that command's seal. Pick one and its readiness, theater map, engines and source grades sit on one page.
 12345
- Integrations, up top. Thunderforge and the other connections are in the first group of the left panel, flagged so a visitor finds them at once.
- The state of the portfolio. Scenarios, running exercises, pending decisions and released injects, counted live.
- Six services. Army, Navy, Air Force, Marine Corps, Space Force and Coast Guard, each with its own seal and scenario count.
- Joint Commands. One button opens every combatant command, each with its own emblem.
- Civil / Interagency. Federal civilian and law enforcement scenarios sit here, so a homeland exercise is not filed under a service.
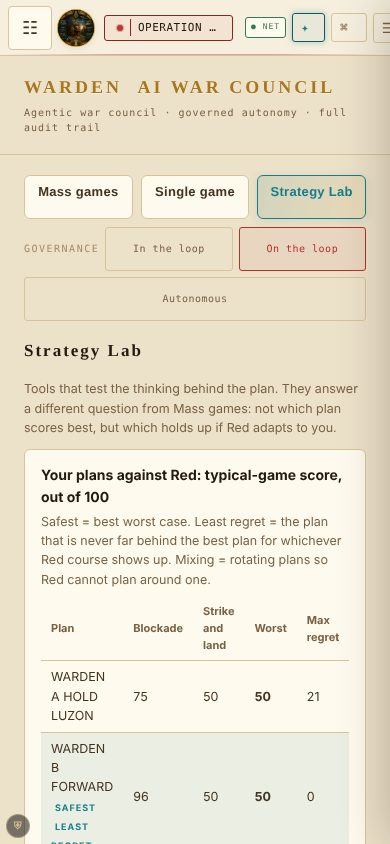
It also works on a phone: the navigation folds into one button and controls are sized for a thumb.
Ask for the best plan. Get one page to brief from.
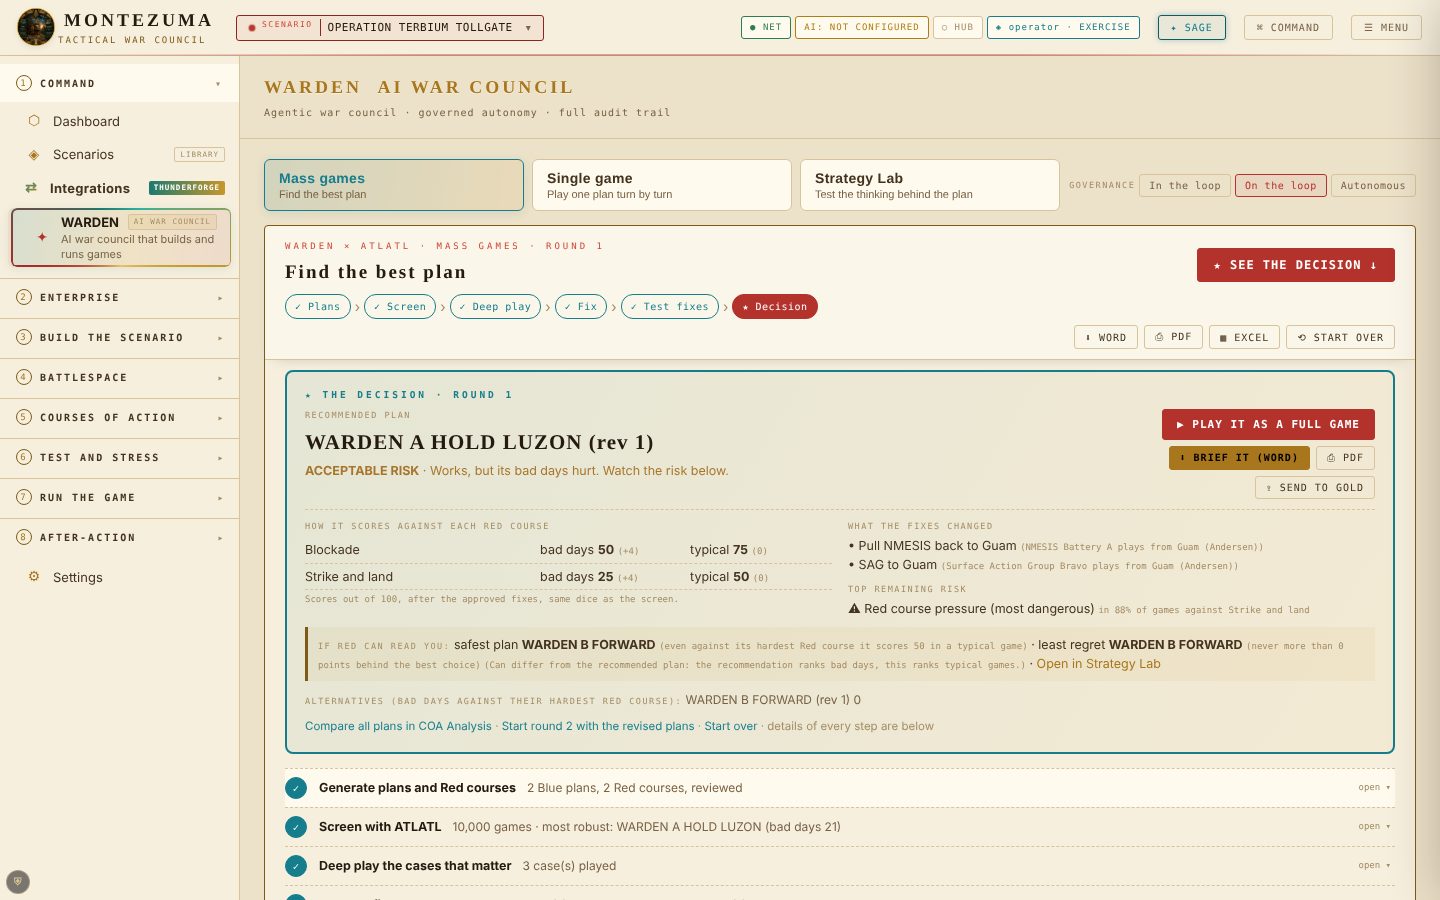
WARDEN is MONTEZUMA's AI war council. In mass-games mode it writes competing plans and Red courses, runs thousands of games on every pairing, plays out the cases that matter, proposes fixes for you to approve, tests the fixes and stops on one decision card. The batch engine, ATLATL, ran 20,000 games in about a tenth of a second in our tests. You approve every change before it counts.
 123456
- Six steps, one button. Plans, screen, deep play, fix, test fixes, decision. The next step is always the one lit button.
- A recommended plan and its risk. Stated in plain words, with the sentence a commander needs: works, but its bad days hurt.
- Scores against each Red course. Bad days and typical days out of 100, using the same dice as the screen.
- What the fixes changed. Each approved change and the top remaining risk, with how often it happens.
- If Red can read you. The safest plan and the least-regret plan, in case Red learns your choice.
- Play it, brief it, send it. Play the plan as a full game, or export the brief to Word or PDF.
Test the thinking behind the plan.
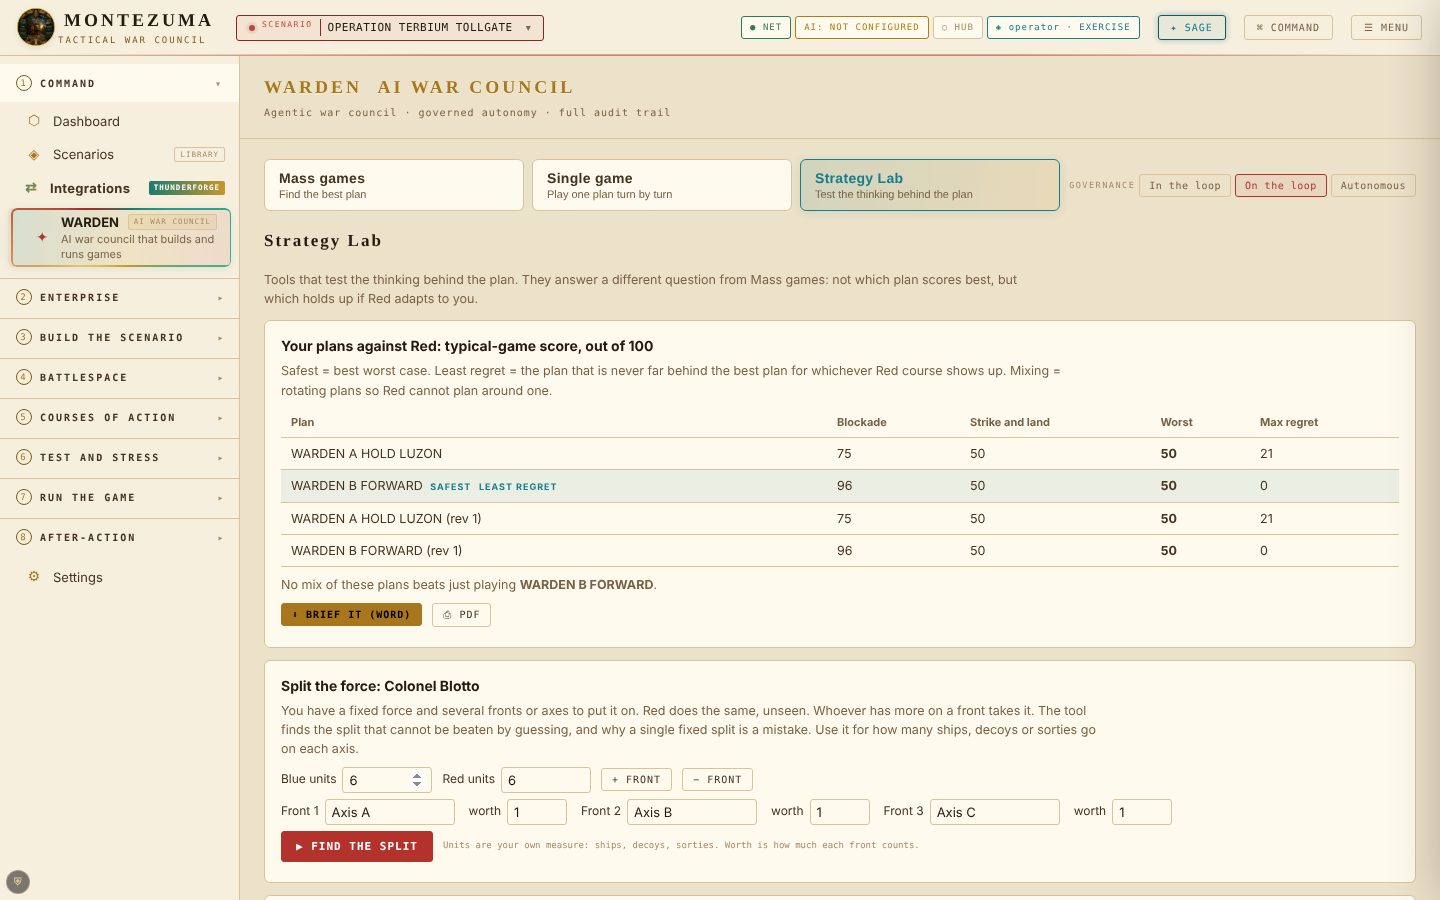
Mass games tell you which plan scores best. The Strategy Lab asks which one holds up when Red adapts. It uses game theory a staff can read: a table of every plan against every Red course, the safest plan, the plan you would regret least, the best mix of plans, a Colonel Blotto split for dividing a fixed force across several fronts, and a move-by-move tree of who moves and who answers.
 123
- Every plan against every Red course. Worst case and maximum regret for each plan, from the games already run.
- Safest and least regret. The plan that holds the best worst case and the plan never far behind the best, marked in the table.
- Split the force. Colonel Blotto finds the split across fronts that Red cannot beat by guessing.
Price a decoy before you build it.
Plans fail when Red works out which target is real. MONTEZUMA's deception scenarios, such as OPERATION IRON MIRAGE, a Taiwan Strait carrier problem, put numbers on it: how many decoys, how likely Red is to see through each one, and what they cost. Try it below. Example values, same arithmetic as the platform's decoy calculator.
| Decoys | Red fooled | Net value |
|---|
Try the engines behind the wargame
Most tools stop at moving pieces and rolling dice. MONTEZUMA models what commanders actually run short of: information, interceptors, throughput and the systems the mission rests on. Try each one below. They run on example values modeled on MONTEZUMA's scenario templates.
Units stay hidden until you find them
Four red units are concealed on this board. Blue and red each see only what they've detected. Pick a search method, then click a hex to search. Woods make units harder to find.
Click any hex on the board to search it.
Every interceptor has a price, and the rack runs dry
A forward base holds 8 low-cost interceptors at $2,000 each and 3 precision interceptors at $400,000 each. Cheap ones fire first. When both are gone, drones get through.
See where the pipeline breaks
Cargo moves through six stages from port to the last tactical mile. Raise the daily demand and watch which stage fails first. Then add escort capacity at the chokepoint.
What breaks if this goes down
One objective rests on three tasks and seven systems. Sealift needs both the fleet and the port; airlift needs either aerial port; distribution needs two of its three routes. Click a system to degrade it, click again to take it down, and watch the status roll up to the mission.
Click any system on the left to change its status.
- Mission dependency web
- Futures: thousands of seeded games
- Staff advisers, J2 to POLAD
- Live field reports
- Adaptive red cell
- Counter-options engine
- Golden Thread traceability
- Seven adjudication modes
- Unit readiness bands
- C2 posture under DDIL
- Hash-chained decision ledger
- White cell approval gates
Walk out with the brief
Every exercise ends in documents your staff can use the same day.
- Commander's brief with the recommended course of action
- Course-of-action comparison with scores and rationale
- After-action report and improvement plan, HSEEP-aligned
- Master scenario events list for the next run
- Mission models import and export as CSV, GraphML and JSON
- Everything exports to Word and PDF
COA 2 holds the strait with the lowest risk to force. Recommend approval with a northern screen as branch plan.
| Risk | Time | Score | |
|---|---|---|---|
| COA 1 | 41% | ||
| COA 2 | 68% | ||
| COA 3 | 33% |
COA 2 holds the strait with the lowest risk to force. Recommend approval with a northern screen as branch plan.
| Risk | Time | Score | |
|---|---|---|---|
| COA 1 | 41% | ||
| COA 2 | 68% | ||
| COA 3 | 33% |
| Capability | Rating |
|---|---|
| Operational coordination | Met |
| Intelligence and information sharing | Partly met |
| Logistics and supply chain | Not met |
Pre-position escort assets at the chokepoint before Phase 2. Owner: J4. Due before next iteration.
| Time | Inject | To |
|---|---|---|
| H+02 | Port restriction announced | J4 |
| H+05 | Surface group leaves port | J2 |
| H+07 | GPS degraded in strait | J6 |
| H+09 | Drone raid on forward base | J3 |
| H+12 | Ally requests escort | J5 |
Everything in the left panel, explained
This is MONTEZUMA's real navigation. Pick any module to see the screen and what it does for your staff. The highlighted ones are what set it apart.
See MONTEZUMA run your scenario.
Bring a problem set. We'll build it on the board and fight it with you.